Easy Sew Stuffed Bunny – Free Pattern

This post may contain affiliate links. Please read our disclosure policy for more information.

Photo of three fabric bunnies made from a simple, free pattern. Finished bunnies shown are 7.5" tall. They have a handmade, farmhouse feel and are standing bunnies cut using pinking shears. The three fabric patterns are a pink small polka dot, purple with flowers and white with a small colorful flower pattern. All three on a white wood background with a hint of greenery to the sides.

Make these cute stuffed bunnies for Spring with my Free Bunny Pattern!

I made rabbit stuffies for Easter and thought I’d share the simple pattern. These adorable bunnies are easy to make. They are 7.5″ tall and the perfect size to decorate a tiered tray, spring centerpiece, or add to Easter baskets.

This easy-sew bunny is a fun, leisurely afternoon project that you can sew easily by hand if you don’t have a sewing machine.

Photo of two floral handmade bunnies in a sitting position. One is white with small blue, pink and yellow flowers. The other is purple with blue, pink and orange flowers in a slightly larger pattern. These decorative bunny stuffies are perfect to decorate for spring or add to an Easter basket. The simple pattern is free. Both bunnies have have been cut from the pattern using pinking shears and measure about 7.5 inches tall.

Supplies

How to Make an Easy-Sew Scrap Fabric Bunny

STEP 1:

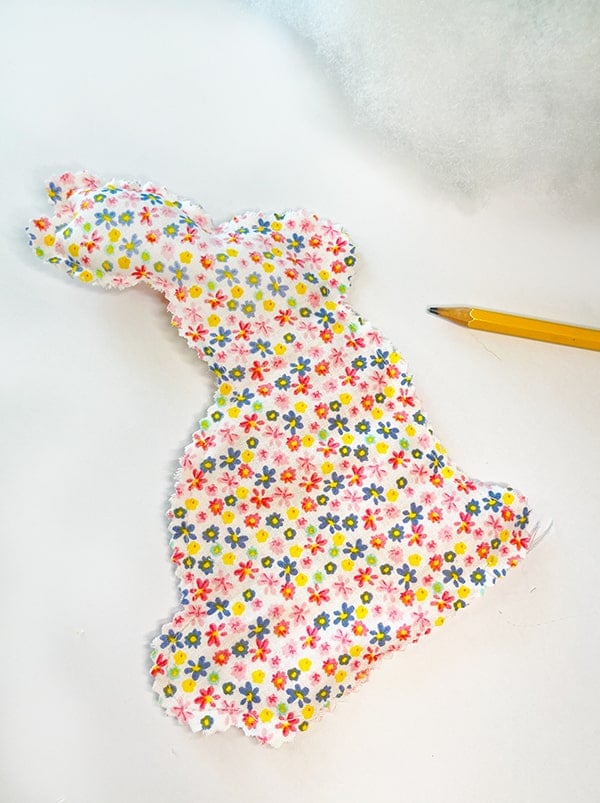
Print the free pattern from the supplies list above at 100% (actual size). Roughly cut around the paper pattern before pinning it to your fabric.

Overhead photo of three bunny patterns positioned on one piece of purple floral fabric with white bunnies. I was able to make three 7-inch bunnies from this one square of fabric.

STEP 2:

Pin the pattern to two pieces of fabric to make a front and a back for your bunny. The fabric should be right-side-out. Cut the fabric along the outer line of the pattern with pinking shears, then remove the straight pins and paper pattern.

Overhead photo of the cut aways from cutting out a fabric bunny along the sewing pattern with pinking shears. The pattern is ready to have the straight pins and pattern removed and ready for sewing.

STEP 3:

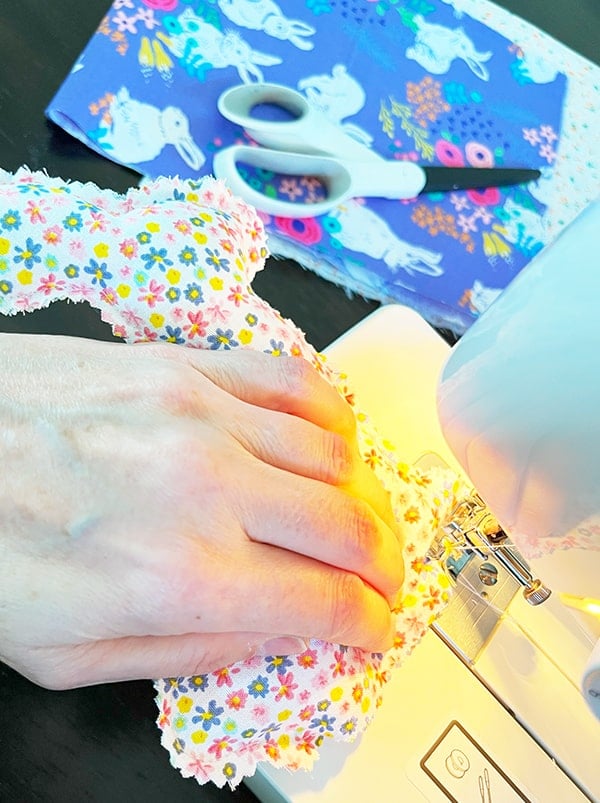
With the fabric still right sides out, top-stitch your bunny together with about a 1/4 seam allowance. Leave the bottom open for stuffing.

Closeup photo of top stitching around a bunny fabric cut out on a sewing machine.

STEP 4:

Stuff with Poly-fil stuffing. Use a pencil or the tip of your scissors to push stuffing into the ears, head, and tail.

Stuffing a floral patterned bunny that has been sew all the way around except for the bottom. In the photo is poly-fil stuffing and a pencil. I recommend pushing the stuffing into the top ears with a pencil and working down to fill the bunny before stitching the bottom closed.

STEP 5:

Then stitch closed and add a bow or other decorations.

Overhead photo of the bottom of a bunny in floral print being stitched up at the very bottom after being stuffed with poly-fil stuffing.
Vertical photo of a white wood crate with eight handmade stuffed bunnies in pinks polka dot, white floral and purple floral patterns for Easter. Some have bows around their neck and others have jute ribbon with a button embellishment. In the background is a ball jar with vintage wood spools and lilacs. Pin this image to your Pinterest craft boards to come back to this easy sewing craft later!
Star divider used has two hand drawn lines with a star in the center, used as a content break and signals new or different content below. This doodle style illustration is in a medium charcoal gray.

– MORE TO EXPLORE –

Free Printable + Fabric Covered Eggs + Farmhouse Egg Wreath DIY

Horizontal feature image of four completed Easter Treat Cups featuring bunny labels with child's names on each cup. Cups are filled with green Easter Basket grass and jelly beans shown in the foreground.
Horizontal photo of a finished bowl of scrap fabric eggs on a table.
Photo of a finished Farmhouse Style Easter Egg wreath. The wreath uses two wire wreath forms, Spanish moss and feature pastel painted plastic eggs.
Horizontal feature image of four completed Easter Treat Cups featuring bunny labels with child's names on each cup. Cups are filled with green Easter Basket grass and jelly beans shown in the foreground.
Free Printable
Horizontal photo of a finished bowl of scrap fabric eggs on a table.
Fabric Covered Eggs
Photo of a finished Farmhouse Style Easter Egg wreath. The wreath uses two wire wreath forms, Spanish moss and feature pastel painted plastic eggs.
Farmhouse Egg Wreath DIY

This Post Has 2 Comments

  1. Jeamie Burris

    Cute crafts

    1. Dawn Stewart

      Thank you –And thanks for stopping by!!

Leave a Reply