
Try this easy mini accordion photo book DIY to create pocket-sized keepsakes for family and friends. Below you’ll find simple steps for printing contact sheets and making a scrap fabric cover.
Supplies
- Digital photos
- A printer
- Good quality cardstock
- A sharp precision (X-Acto) knife
- A ruler or straight-edge
- Lightweight cardboard (like a shirt box or cereal box)
- Scrap fabric
- A glue stick
- Hot glue gun
- Scissors
- A cutting mat
How To Print Photos in Strips – 5 Easy Steps
STEP 1: Gather Your Digital Photos
First, gather up all the digital photos you’d like to use in your accordion photo book and put them in a folder on your desktop. I found that nine photos made a good-sized mini photo book. You can use—all vertical photos—all horizontals—or both!

STEP 2 – Print a Contact Sheet
Select all of the photos in your folder.
On a PC, right-click and choose Print. On Mac, open the File menu and select Print. You may need to choose More Options to see the full print menu.
In the Print dialog box, choose a contact-sheet style layout. I’m on a PC, so I selected the Wallet size option. On MacOS, you can set the number of images per page to create a contact sheet.
Before printing, select the option to print as a PDF file so you can save and reprint the sheet as needed.

STEP 3 – Print The Contact Sheet to Your Home Printer
Print the PDF photo contact sheet to your home printer. To make a Mini Accordion Book, small enough to fit into a small tin (link to the decorative tin tutorials below), Print the PDF file 80% size.

STEP 4: Assemble Photo Strips
After you have your photos printed on cardstock, cut each row of photos using a straight edge and a precision knife as shown below.

Your photo strips should look like this, with tabs to glue together into one long strip. Lightly score between photos with your precision knife and bend it into an accordion.


Use a glue stick to glue the photo strips together into one long strip.

STEP 5: Make a Cover
Measure your Accordion Photo Book – closed size. Use these measurements to cut a front and a back cover out of lightweight cardboard. Cut fabric or decorative paper a little larger than your cover. Cut notches at each corner as shown. Hot-glue the flaps to the cardboard.
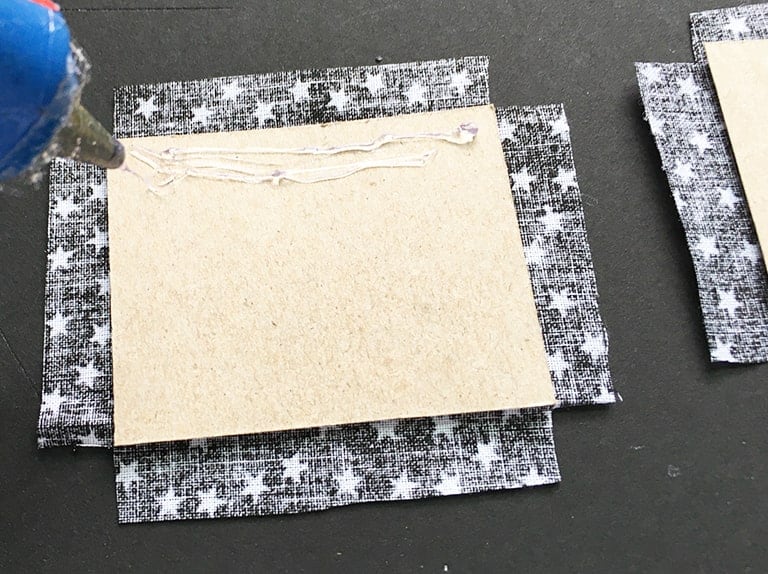
Finish the cover by adding white cardstock to the inside and write a personalized note on the inside cover if you like!


 Hi, I’m Dawn, a graphic designer, mom and weekend crafter! Join me on my adventures! I always have something new and inspiring going on. Learn more about me