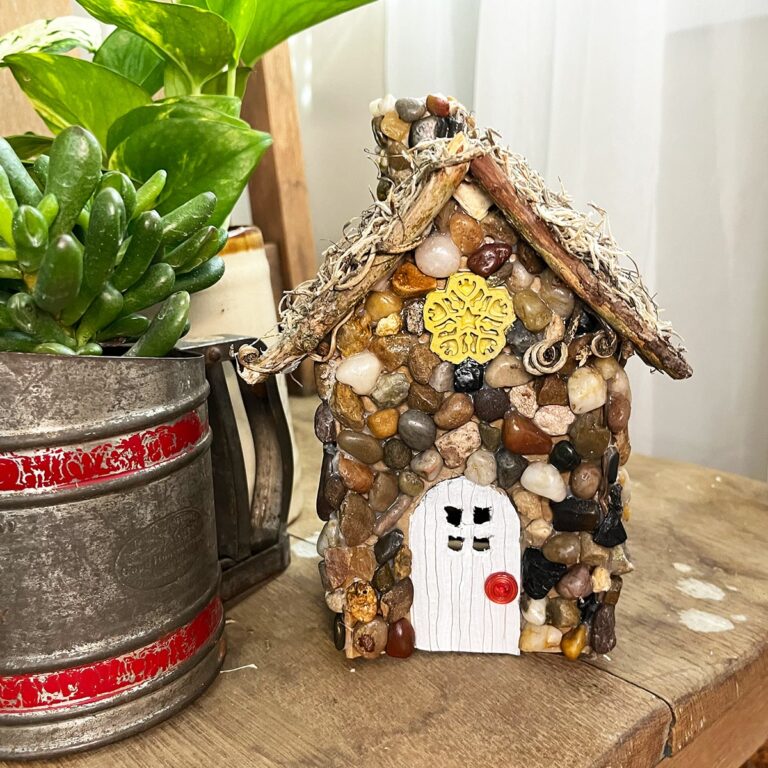
I first made this stone-and-cardboard fairy house with my son for his Tooth Fairy Garden, and it’s been one of my most-requested DIYs ever since. In the original post, I shared the template but skipped the full build—this time I’m walking through every step so you can make one too (finished size: about 7″ tall by 5″ wide).
Quick heads-up: this is a slow, hands-on project. Plan for about two hours of gluing, plus a couple of days of drying time between steps—but the result is a sturdy, detailed little house that becomes a focal point in any fairy garden.

Supplies
- Small pebbles
- craft sticks, twigs, craft board cutouts, or a laser wood cutout for the window
- A button for a doorknob
- Corrugated cardboard
- Floral Moss for the roof (I’m using Spanish floral moss)
- Scissors
- A pencil
- An X-Acto precision knife
- Acrylic paint
- Tacky glue (lots of Tacky glue!)
- Clear packing tape
- Clear scotch tape
- Wax paper
- Elastic bands (small clamps are helpful too)
- Printouts of the Tooth Fairy Garden House template
How to Make a Fairy Garden House – Video

How to Make a Fairy Garden House – 5 Steps
STEP 1:
To start, cut and assemble all of the pieces for your house out of corrugated cardboard using the template provided in the supplies list. For smooth folds, go with the grain of the cardboard (vertical).

STEP 2:
As shown in the two photos below, prep a window and cut the front door out with scissors and windows in the door with a precision knife. You can make a window out of anything you have on hand. I found a package of craft board laser cutouts at Dollar Tree in the shape of stars and used one to make a window. You can also glue together thin craft sticks or small twigs from the yard.


Paint the window and door any color you like. I painted my door white and made lines to resemble wood by scraping away the white paint with a pencil. See the video above for more details.

STEP 3:
For all of the gluing, I recommend working on waxed paper. This will make cleanup easie,r and you can move pieces more easily. Make the stone sides by applying a generous amount of tacky glue to the cardboard, and pushing the stones into the glue. Let dry overnight.


STEP 4:
Tape the chimney together and add glue to secure it to the roof. Then tape the sides of the chimney to the roof.

Use tacky glue to glue floral moss to the roof. It’s helpful to use a piece of waxed paper to press the moss into the glue.

Glue small stones onto the chimney. Work one side at a time and let the glue set up before going to the next side. Let the roof dry overnight.

STEP 5:
After the roof, and two sides have fully dried, you’re ready to assemble the house. Start by taping the sides of the house together using packing tape along the back.

Then glue the roof on by applying tacky glue to the top edge where the roof will sit. Use a generous amount of glue and don’t worry if it drips, it will dry completely clear. See the video above for more details.

Important: Add more glue along the side seams that you taped. Adjust the roof and sides as needed and secure them with clamps and rubber bands. Let dry overnight.

Finish your fairy garden house by adding any embellishments you like. I glued twigs to the roofline of my house.
Important Note: I recommend keeping this little house out of the rain and setting it on a flat stone or a tile to keep it from coming into contact with moisture while watering the plants in your fairy garden.


RELATED IDEAS


 Hi, I’m Dawn, a graphic designer, mom and weekend crafter! Join me on my adventures! I always have something new and inspiring going on. Learn more about me
This Post Has One Comment
Fabulous site Dawn. Really comprehensive and inspiring. Many thanks, Mags