A small collection of pineapple-inspired crafts and upcycle ideas designed to brighten your home and add a little sparkle to summer. Inspired by a trip to Hawaii, these cheerful projects are easy crafts for adults and teens alike.
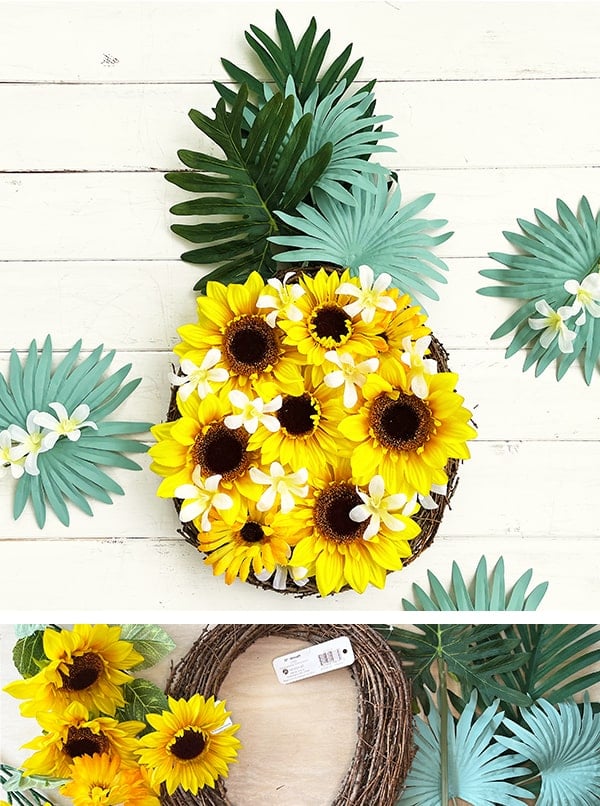
1. Pineapple Flower Wreath
Pick up a grapevine wreath, silk flowers, and a few palm leaves to make this beautiful summer wreath for your front door. Find the full pineapple sunflower wreath tutorial here.
2. Pineapple Book Stack
An easy and affordable way to incorporate pineapple imagery into your existing decor is to add a pineapple-themed book stack! Just gather a few hardcover books and cover them with this pretty paper.
I purchased these beautiful digital papers from Masha Studio. If you’d like to download and print the same designs, you can link to her store here on Etsy.

3. Utility Light Turned Pineapple Bud Vase
This propagation bud vase was made from an old utility light that I found at the flea market for $1! Maybe you have one of these in your basement. If not, you can pick up an inexpensive one at any hardware store and paint it! I just added a slender glass jar for my bud vase.

4. Welcoming Pineapple Sign
This colorful pineapple sign is fun and easy to make. You only need a few supplies from the craft store and your local hardware store. Find the full welcoming pineapple sign tutorial here.

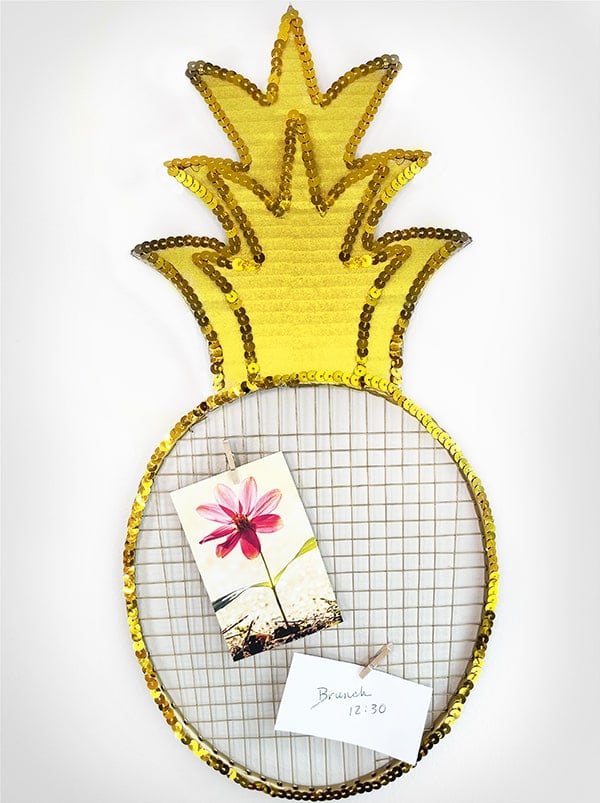
5. Pineapple Memo Board
Make this sparkly memo board with just a few supplies. You’ll need an X-Acto or precision knife, gold spray paint, an old tennis racket (or a dollar store badminton racket), cardboard, sequin ribbon, and a hot glue gun.
Start by cutting a pineapple leaf top out of cardboard—find the template here. Next, cut away the handle with a hacksaw and hot-glue the pineapple top to the racket. Spray paint and hot-glue sequin ribbon along the edges to finish.
6. Framed Pineapple Art
This framed pineapple art was an easy and inexpensive DIY. I found this beautiful yellow picture frame at the flea market. It’s not an antique, I just really liked it! Here is a link to a similar distressed yellow frame on Amazon. For the art, trace and cut a pineapple shape from a metallic-textured Dollar Tree tile decal.

7. Fruity Coasters
Turn simple wood slices into cheerful pineapple and orange coasters using felt, acrylic paint, and a clear protective finish. Once painted, seal the tops with polyurethane for durability, then add felt leaves and backing pieces with hot glue. A printable template is included to make shaping the felt pineapple leaf details quick and easy. Download the printable pineapple coaster template here.

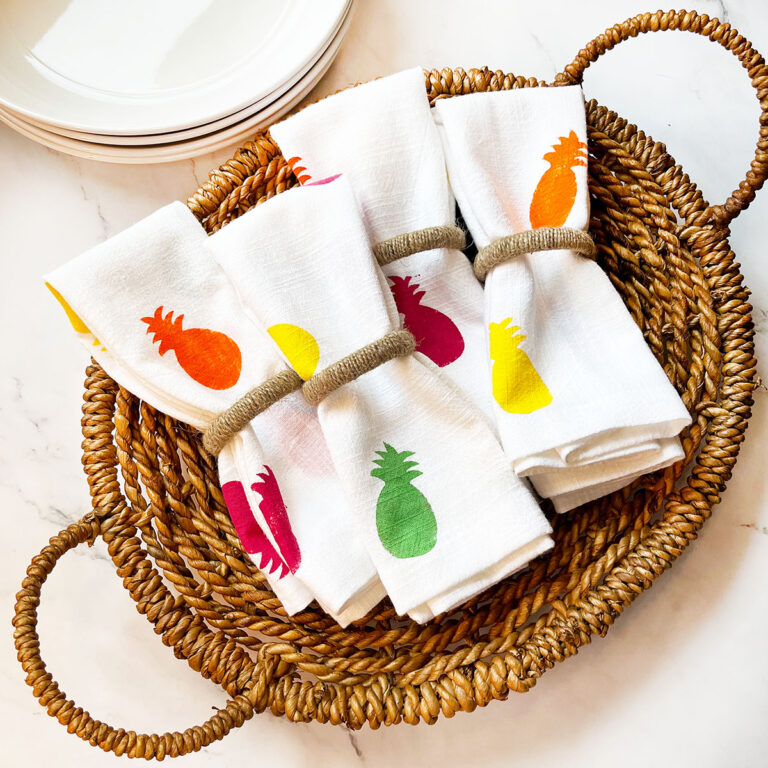
8. Pineapple Stenciled Cloth Napkins
Add a pop of summer color to plain white fabric napkins using fabric paint and a simple pineapple stencil. A printable pineapple stencil (PDF + SVG) is included here for creating the design; it can be cut with a cutting machine or made from freezer paper by cutting out the shape and lightly ironing the shiny side to the fabric, then peeling it away after stenciling.


RELATED IDEAS

 Hi, I’m Dawn, a graphic designer, mom and weekend crafter! Join me on my adventures! I always have something new and inspiring going on. Learn more about me