
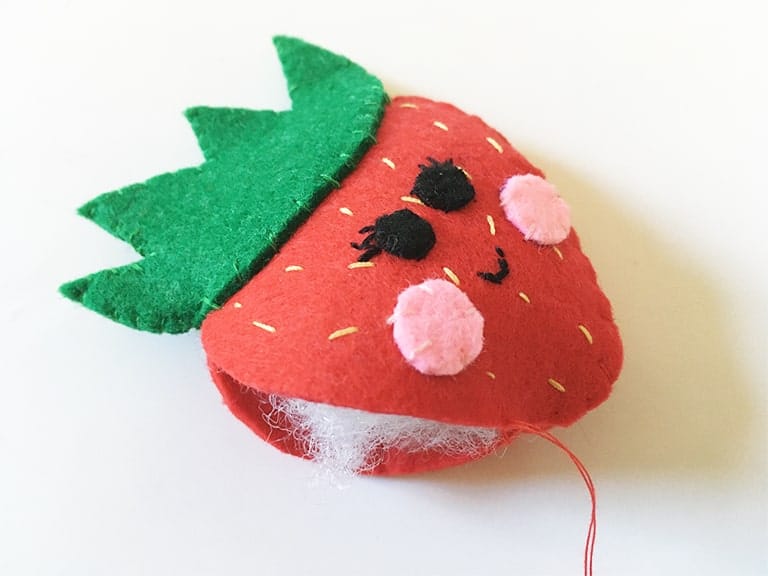
These hand-stitched felt strawberry magnets make for a great cozy evening craft. After making a couple my stitches became more uniform, and I finished them by adding magnets to the back and packaged them as a gift-ready set.
Supplies
- Red, green, pink, and black craft felt
- Red, green, pink, black, and yellow thread
- Sewing needles
- Scissors
- Poly-Fil stuffing
- Peel and stick magnets
- Plastic or wood berry container (optional)
- A printout of the gift labels (optional)
- A printout of the Felt Strawberry Magnet Template
How to Make Felt Strawberry Magnets – 5 Easy Steps
STEP 1:
Start by cutting out all the felt pieces needed using the template in supplies list above. Cut out a red berry front and back, two green tops, two pink cheeks, and two small black eyes.

STEP 2:
Next, use a light yellow thread to stitch seeds. I stitched them onto both the front and back felt pieces. Don’t worry about how messy the stitches are on the wrong sides of the felt, that will be on the inside.

STEP 3:
Attach the felt eyes and cheeks, then stitch the mouth using black thread and a basic backstitch. Finish by overstitching the green top onto both felt pieces, keeping placement consistent so everything lines up when assembled.

STEP 4:
Sew the two body pieces together, starting at the top with green thread. Switch to matching red thread to stitch around the strawberry body, leaving about a one-inch opening for stuffing. Fill with stuffing, stitch closed, and finish by adding a magnet to the back.
Download a PDF of the Berry Gift Labels:


 Hi, I’m Dawn, a graphic designer, mom and weekend crafter! Join me on my adventures! I always have something new and inspiring going on. Learn more about me