
This mosaic picture frame tray is a simple way to turn broken or mismatched ceramic plates into a one-of-a-kind serving piece. Start with a thrifted picture frame or wooden tray, then use chipped or colorful plates to create a custom mosaic design with lots of character.
DIY Mosaic Picture Frame Tray – Video

Supplies
- Paint (I’m using Rust-Oleum Chalked Spray Paint in Linen White)
- A paintbrush (if needed)
- A wood picture frame
- Small nails (sometimes called finishing or picture frame nails)
- Two cabinet handles
- Wood panel or craft plywood (for the bottom)
- Colorful ceramic dishes (mine are from Dollar Tree)
- Tools: Safety glasses, a hammer, a screwdriver, a drill, and a small putty knife
- A ruler and a pencil (to line up and mark the holes for the handle)
- An old towel or cloth (to break ceramic plates under)
- A sponge and a bucket of fresh water (to remove excess grout from the ceramic pieces)
- A soft cotton cloth (to clean the mosaic)
- Tile grout
- Craft glue
- Spray sealer (optional)
How to Make a Mosaic Picture Frame Tray – 5 Easy Steps
STEP 1:
If you’re using an old picture frame, remove the glass and hardware. Then, cut a craft plywood board to size and secure it to the back using small nails or screws to make a bottom for your tray. Spray paint your picture frame tray on both sides.

Attach handles to your picture frame.

STEP 2:
Break ceramic plates by covering them (front and back) with a thick towel. Use a hammer to break the plate into small pieces. You can also use a handheld tile cutter. Wear safety glasses when breaking or cutting glass! Throw out any curved or thick pieces from the rim of the plate. Use flat pieces to avoid curves and dips on your tray’s surface.
Check out the Video above for more details on how to make this beautiful tray!

STEP 3:
Spread a thick layer of craft glue over the surface of your tray and glue your mosaic pieces in place. Arranging ceramic pieces like a puzzle. Leave 1/4 to 1/2-inch space between pieces, and remember to leave space around the edges. Be careful handling broken ceramic pieces—they are sharp!


STEP 4:
With the craft glue dry, it’s time to grout. I’m using a pre-mixed tile grout that you can find at any hardware store. If you have a powder grout, prepare it according to the instructions.

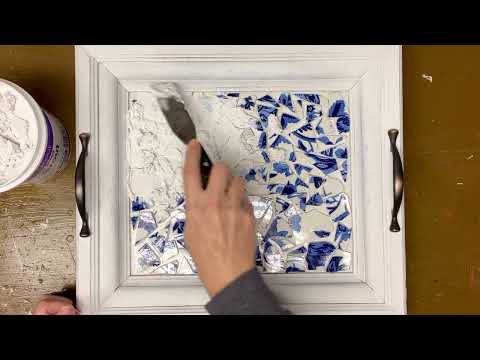
Smooth the grout over your ceramic pieces using a putty knife. Make sure to push enough grout between the tiles, and don’t worry if you get a build-up in the corners, you can remove that with a putty knife in the next step.
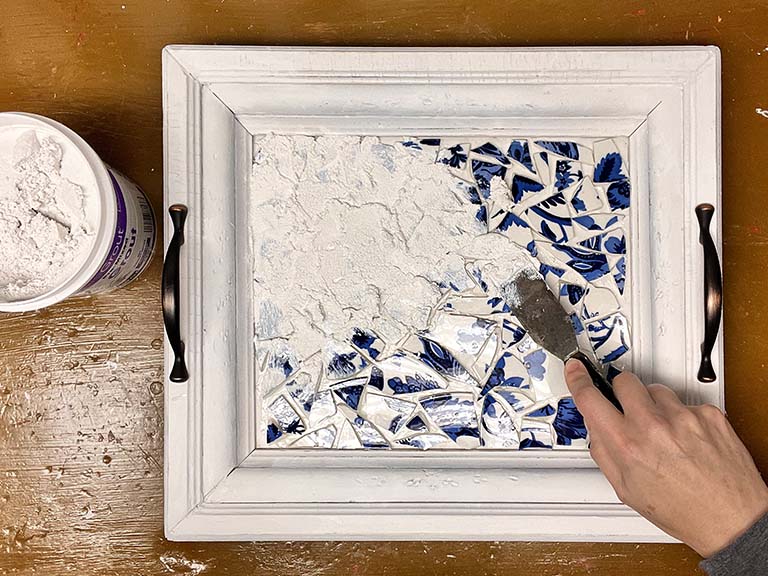
STEP 5:
Before letting your tray dry completely, remove excess grout from the surface with a small damp sponge. Make sure to wring as much water out of your sponge as possible and change the water out as needed.
Important: Don’t dump the water down the sink. Take it outside as it may clog the pipes.

Use a soft cloth to polish each mosaic piece before letting the grout dry for 24 hours.

Last, apply a protective coat of polyurethane once fully cured, typically 24-72 hours (optional).


 Hi, I’m Dawn, a graphic designer, mom and weekend crafter! Join me on my adventures! I always have something new and inspiring going on. Learn more about me