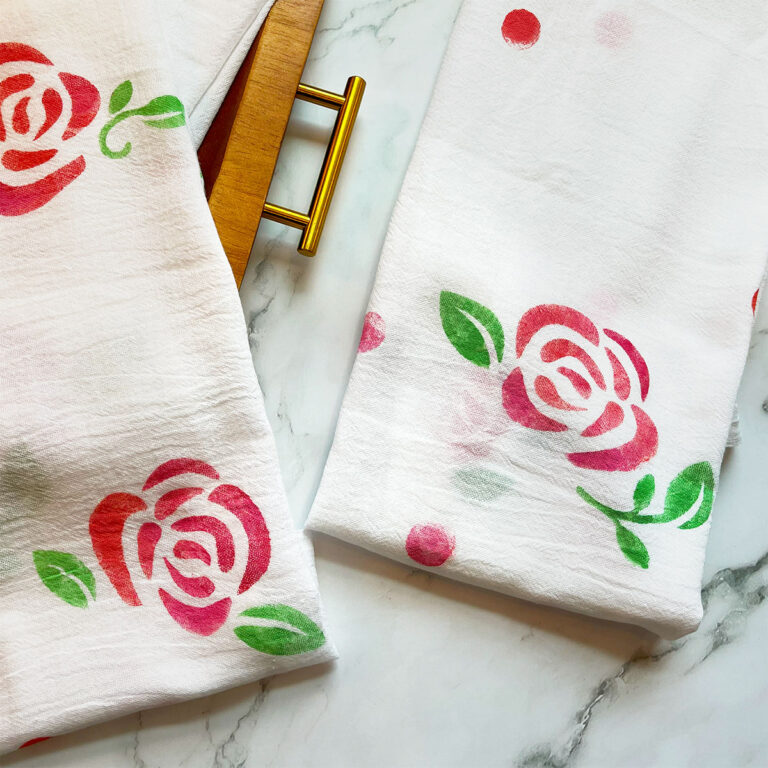
These hand-painted tea towels add a personal touch to any kitchen and make thoughtful gifts for Mother’s Day or special occasions.
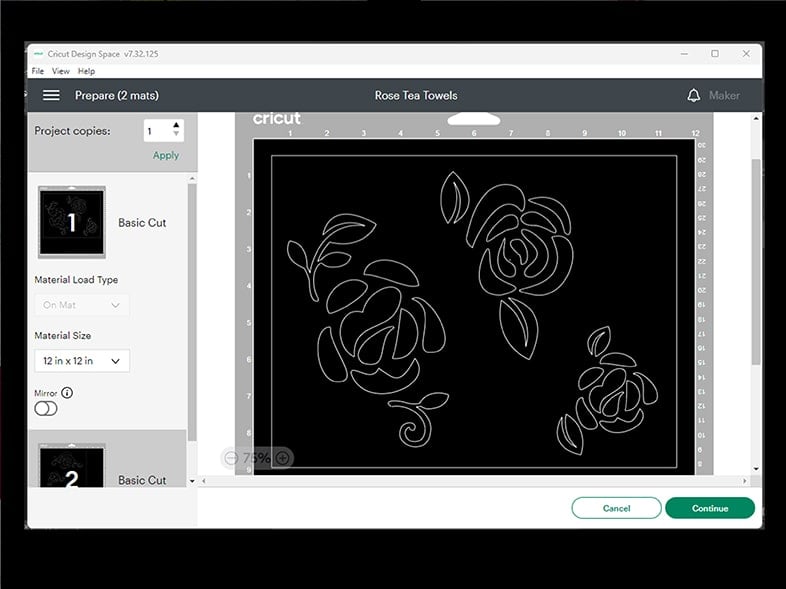
Brush-on fabric paint, a simple stencil, and plain cotton towels are all you need. You can use a purchased stencil or cut your own—this project uses patterned rose art cut from removable vinyl on a cutting machine (SVG provided in the supplies list).
Tips for Painting on Fabric
- Iron towels before painting so the surface is smooth and flat. Place a protective layer underneath to prevent paint from bleeding through to your work surface.
- Use brush-on fabric paint with a gentle dabbing motion, working with dry brushes and avoiding added water. If using multiple colors, designate one brush per color.
- Allow paint to dry fully before removing stencils, and follow the manufacturer’s instructions for curing and washing.
Supplies
- Cotton flour sack tea towels (find them at Walmart or here on Amazon).
- Fabric paint (Here is a link to the FolkArt set used in this DIY)
- Paintbrushes and stencil brushes
- A cutting machine (I’m using a Cricut machine)
- Stencil vinyl
- Transfer tape
- Weeding tools and a standard grip mat
- Scissors
- A foam core board or something to protect your work surface
- Free Rose SVG stencils – click here to download

How to Make Hand-Painted Tea Towels – 3 Easy Steps
Prep: Prewash your towels if you like and iron them. Lay your towel on a flat surface that will protect your work surface. A posterboard or foam-core board works well.
STEP 1: Cut Your Stencil On Removable Vinyl
If you’re cutting a stencil out using stencil film or removable vinyl, I recommend using transfer tape to transfer the design to your tea towel.
Stick first, stick your stencil to a dishcloth or towel to lint up the back a little before placing it on the tea towel. I didn’t do this the first time around and my stencil film stuck firmly to the tea towel, and I had to do a lot of extra pulling to remove it.

STEP 2:
Shake your paints well. You can also mix them on your paint palette to make new colors as I did. Here I mixed white with red and orange to make a peachy pink color.
Dip your paintbrush into the paint and dab any excess onto the side of your paint palette. I’m using paintbrushes for smaller areas and foam stencil brushes for larger areas.

STEP 3:
Remove your stencil and let dry for 24 hours before setting them with an iron. Follow the instructions for your particular paint. According to the directions on the FolkArt bottle, do not use a steam iron—dry heat only. Wait for 72 hours before hand or machine washing in cool water.

More Photos of My Finished Tea Towels.


RELATED IDEAS


 Hi, I’m Dawn, a graphic designer, mom and weekend crafter! Join me on my adventures! I always have something new and inspiring going on. Learn more about me