
A collection of DIY wood sign ideas—perfect for seasonal decorating or selling.
Most of these projects started with scrap wood, vinyl, a cutting machine, and paint—nothing fancy or hard to source.
Many of the projects featured here use digital artwork from my own shop. I’ll note those throughout the post and link where helpful.
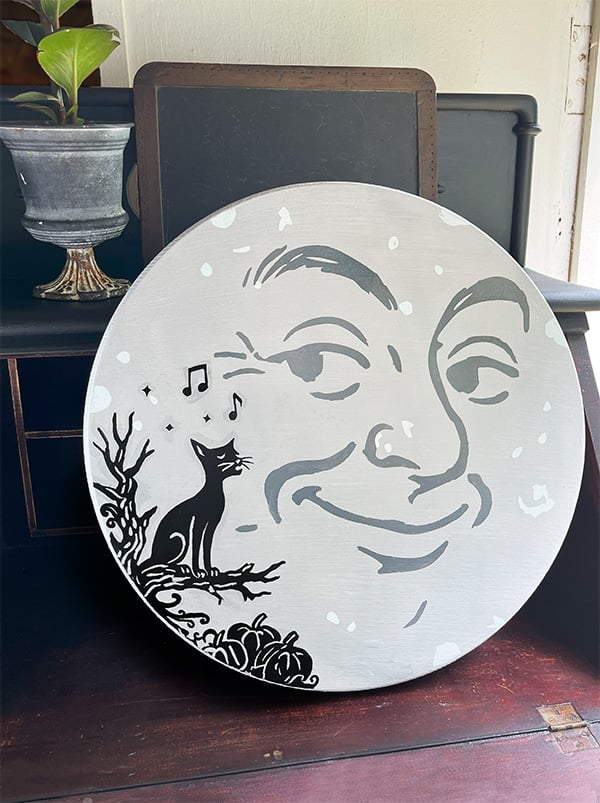
1. Fall Moon Sign
This vintage Man in the Moon sign, made with a design in my shop, will be heading to my antique booth for the Fall reset. You can find large wood rounds at the hardware store, but I like to pick them up at Goodwill when I run across them. I usually have to sand and give them a fresh coat of paint, but it’s a good way to save money.
I cut the stencil using stencil vinyl and filled in the design with black, gray, and light gray acrylic paint. My moon spots aren’t perfect—alignment on round signs can be tricky—but that’s part of the charm.
2. Halloween Broom Shoppe Sign
This sign was made from an old cutting board, and the curved wood top and bottom pieces came from a wooden gun rack. Both were thrift store finds that were tucked away in my garage.
I originally painted my board white and cut the type and broom illustration with my Cricut to use as a reverse stencil. Once the vinyl cutouts were in place, it was time to cover the entire board with black paint. The broom is also a DIY in my archives—you can find the full witch broom tutorial here.


3. Cheery Summer Signs
These fun summer signs were made with scrap wood from my garage and permanent vinyl that I cut with my Cricut and my own digital designs. Since I had boards of different sizes, I measured and scaled the graphics in Cricut Design Space to fit each.
First, I sanded and painted the boards, then I layered the cut vinyl pieces for each sign onto a single layer of transfer tape for easy transfer. They came out great, and I love that I could use supplies I already had on hand.

4. Rustic Stackable Word Block Signs
These signs were designed using a reverse stencil technique to let the stained wood show through. Find the full tutorial and templates here.

5. Two Scrap Wood Signs for St. Patrick’s Day
For both of these signs, I cut stencil vinyl and filled the design with green and black acrylic paint. But I decided to cut and adhere permanent vinyl for the tiny menu type. Sometimes you have to combine techniques. Find the full stenciled St. Patrick’s Day signs tutorial here.


6. Wine Tasting
Another rustic sign idea made with stencil vinyl cut on my Cricut and my own design. I wasn’t sure how this one was going to come out because this thrift store board has a lot of texture. I adhered the stencil vinyl well with a squeegie and used Cricut brand stencil vinyl—it sticks the best out of all the ones I’ve tested. The paint did bleed a little under the stencil, as I expected, but not much. I think it adds to the rustic charm of this sign.


7. Christmas Shelf-Sitter Signs
These Christmas shelf sitter signs are simple to make and a great project for beginners or a relaxed weekend crafting. The set includes four original SVG designs sized specifically for 4″ x 4″ x 1″ sign blanks. The designs are cut from White permanent adhesive vinyl on a cutting machine (no mirroring needed) and applied to painted wood blocks with transfer tape. Download the free SVG sign art here, along with two bonus designs.

8. Another Large Round Sign On A Budget
To make this fun sign for my antique booth, I used another sign board found at Goodwill and my own digital design. After sanding and painting the wood round, I took a little time to determine the best way to cut the vinyl. Some of the elements were wider than my Cricut mat, so I cut the design into pieces. I also added triangles as registration marks to help me line up the vinyl and get everything centered.
To finish, I decided to add a little retro charm by stapling vintage Christmas lights found at ReStore. A little over the top, but I think Christmas in July is one of those times where you can dial up the kitschy.


9. Thrift Store Pizza Peel Sign
When shopping for sign blanks, try thrift stores to find cabinet doors, cutting boards, or a large pizza peel that can be repurposed. These thrifted finds often have an aged patina, and can give a new design old-world charm. This is another stenciled sign using my own digital design.


 Hi, I’m Dawn, a graphic designer, mom and weekend crafter! Join me on my adventures! I always have something new and inspiring going on. Learn more about me