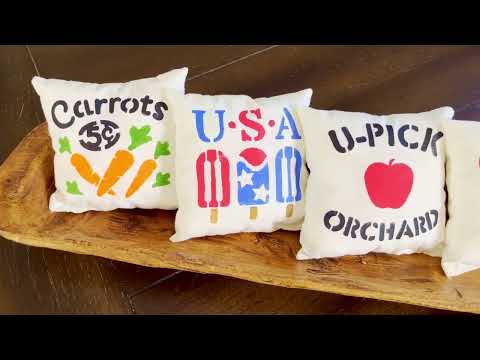
Make these adorable DIY Mini Pillows to decorate your tiered tray, or to give as gifts!
These little pillows are easy to make. The finished size is about 4 inches and there are four designs to celebrate the seasons!
In this DIY, I stenciled the art onto my pillows to give them that perfectly imperfect, rustic feel. Check out the how-to’s and follow along with the video below to make them.
DIY Farmhouse Mini Pillows – How-to Video
Supplies
- A cutting machine (I’m using a Cricut Maker)
- A cutting mat, stencil vinyl (or removable vinyl), transfer tape
- Fabric
- Poly-Fil stuffing
- Scissors
- Acrylic paint
- Small stencil brushes or foam applicators
- Needle and thread, a sewing machine, or Peel and Stick Fabric Fuse Tape
- Stencil files –> Mini Pillow Stencil Art
How to Make Farmhouse Mini Pillows – 4 Easy Steps
STEP 1: Cut A Stencil
First, download the stencil designs from the supplies list. There are two file types included, a PDF for color reference and an SVG File to upload to your cutting machine.
Cut one mini pillow stencil at a time or use a full 12″ x 12″ sheet of vinyl to cut all four stencil designs as I did here.
Secure your vinyl to a Standard Grip mat using a brayer then upload the SVG file art you choose to Cricut Design Space or Silhouette Studio. I’m using stencil vinyl and a Cricut Maker so I selected the Stencil Vinyl setting in Cricut Design Space. Use the best settings for your machine and material.

STEP 2: Cut Your Fabric
Cut two squares of fabric pieces (about 7 inches in diameter) for the front and back of your pillow. Apply your stencil to the center of the front piece of fabric.
Use a stencil brush and dab downward to apply acrylic paint to the stencil. Let the paint dry completely before going to the next step.
Tip: I recommend using a separate stencil brush for each color. If you don’t have separate brushes and need to wash a brush, make sure to dry it really well. I made the mistake of not drying my foam applicator well and the excess water made the paint seep and run under my stencil.

STEP 3: trim to Size
STOP!!! Do not remove the stencil just yet! Before removing the stencil from your fabric, line up your second piece of fabric behind it and cut around the square border. This will give you a 5.5-inch square (pillow front and back) and your art will be perfectly centered on the fabric. See the video for more details.

++++++++
 | Helpful Tip Save your stencils onto the original backing to use again later! |
++++++++
STEP 4: Sew And Finish
Sew the wrong sides together leaving enough of an opening to flip inside out and add stuff. Sew in a ribbon at the top corners to hang them up!
Note: Sew your pillows by hand, with a sewing machine or try Peel and Stick Fabric Fuse Tape for a no-sew option.


++++++++
RELATED CRAFT IDEAS:
 | Learn how to make beautiful tiered trays using thrifted items. |
- How to Make a Wine Cork Tray Using a Stretched Canvas
- Santa’s Sleigh & Reindeer Floral Pick
- Reindeer Bean Bags – Free Pattern
- Hand-Painted Tea Towels DIY – Free SVG Stencil Art
++++++++
Advertisement
 Hi, I’m Dawn, a graphic designer, mom and weekend crafter! Join me on my adventures! I always have something new and inspiring going on. Learn more about me