10 Christmas Tiered Tray Ideas – Easy DIYs

This post may contain affiliate links. Please read our disclosure policy for more information.

Square feature image of four out of ten Holiday Tiered Tray DIYs.

10 DIY Christmas Tiered Tray Ideas to decorate for the Holidays!

These holiday-tiered tray ideas are affordable and fun to make. They also make great handmade gifts and easy handcrafted items to make and sell at your next craft show.

Advertisements

1. Festive Fringe Ribbon Trees

Make these cute fringe ribbon trees in minutes. I picked green fringe but there are many colors available.

Photo of three DIY Fringe Christmas Trees on a round tray with a mint green deer ornament in front.
DIY Fringe Christmas Trees

Supplies: Lightweight cardboard, a hot glue gun, and 1-inch wide fringe ribbon (here is a link to the ribbon that I bought on Amazon)

To make them, you’ll need to cut circles with a slit out of lightweight cardboard. Your circles do not need to be perfect but make them about 9-11 inches in diameter and use hot glue to glue each cone together.

Circle of cardboard cut to make a DIY Fringe Christmas Tree.
Cut a circle out of lightweight cardboard to make a cone.

Next, wrap the ribbon around the cone starting at the bottom and work your way up. Use dabs of hot glue to glue the ribbon in place as you move up the tree. I recommend not cutting the fringe ribbon from the roll until you’re finished making your tree so you don’t cut it too short. To finish, use a comb to fluff up your fringe if needed.

Green fringe ribbon being hot glued to a cone to make a DIY Fringe Tree.
Wrap fringe ribbon around the cone and use dabs of hot glue as needed.

2. Miniature Wood Tumble Block Ladder

Buy a package of wood Tumbling Tower Blocks from Dollar Tree to make this cute ladder for your Holiday tiered tray.

Finished ladder made out of tumble blocks from Dollar Tree shown on a white tiered tray with a mini green wreath for decoration.
Miniature Wood Tumble Block Ladder

Supplies: 11-14 wood tumbling tower blocks, wood glue, woodworking clamps, smaller 2-inch crafting clamps, paint, and decorations.

Start by determining how tall you would like your ladder and use wood glue to glue the blocks together. Secure them with clamps to hold them together while they dry.

Note: If you’re short on time, you can use hot glue to make the ladder. The bond will not be as strong as wood glue but this is an option.

Supplies used to make a miniature ladder for a tiered tray.
Gluing the sides of the ladder.
Clamps holding the rungs of a tiered tray ladder while the wood glue is drying.
Finishing and gluing the rungs of the ladder.

++++++++

Advertisements

Pro Styling Tip

When styling your tray, Use wood slices to elevate decor pieces that need a little height.

++++++++

3. DIY Holiday Wood Signs – Free SVG Art

Make your own mini signs to decorate your tiered tray. If you have a cutting machine it’s easy to make your own signs. I have four free designs already sized for a 4″ sign, free to download in the supplies list below.

I’m using 4″ x 4″ wood blanks that I purchased on Etsy from the TatteredPine shop. These boards come sanded and blemish-free. If you’re handy though, you could pick up a pine wood board and cut it. You may even be able to get the hardware store to cut it for you!

White tiered tray showing all four 4-inch DIY Holiday Wood signs. Free SVG art to make all four.
DIY Holiday Wood Signs

Supplies: 4″x 4″ unfinished wood sign blanks, the free 4″ x 4″ Holiday Sign Art SVGs, paint and a brush, a cutting machine (I’m using a Cricut Maker), a standard grip mat, permanent or removable vinyl, transfer tape, scissors

Paint your wood boards any color you like. I used red and green acrylic paint. Next, upload the 4″ x 4″ Holiday Sign Art into Cricut Design Space or Silhouette Studio. Cut the art onto permanent vinyl and use transfer tape to place it on your signs.

++++++++

Advertisements

Related Post


Learn how to make beautiful tiered trays using thrifted items.

++++++++

4. Mini Holiday Crate

This crate is full of fun Christmas miniatures that I’ve collected. I found the mini crate at Dollar Tree but you can get one at most craft stores. Stain or paint your crate, then add greenery and fill it with miniature treasures!

Miniature wood crate shown on a tiered tray filled with greenery and miniatures like pinecones, candy canes and a mini santa gnome ornament.

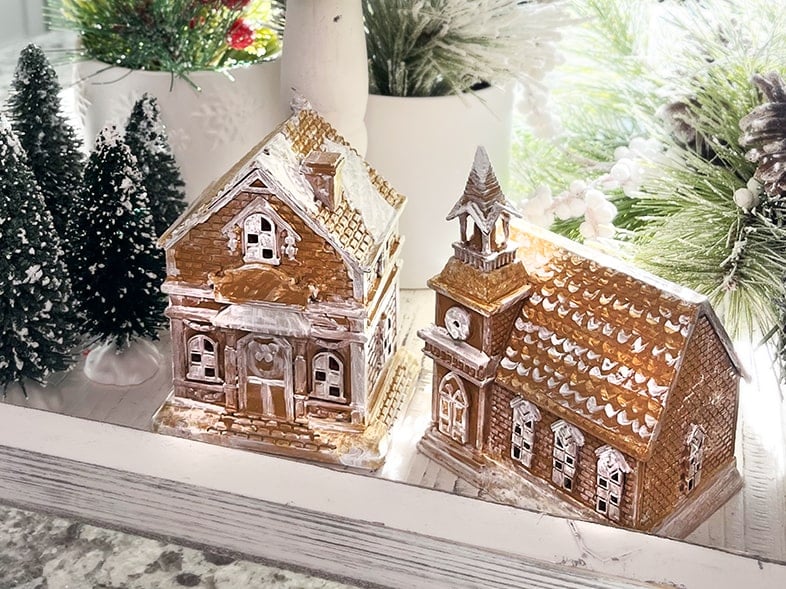
5. Dollar Tree Gingerbread Houses Makeover

This is not a new idea but I thought I would share my Dollar Tree miniature house makeover with you. There are some awesome ideas on Pinterest using these little houses so I thought I’d give it a try and make a few gingerbread-looking ones.

Supplies used to make gingerbread houses.
Before

To make them look like gingerbread, I painted each plastic house with Classic Caramel acrylic paint using a chip brush. It took a couple of coats and drying time in between. Then I went in with a small paintbrush and white acrylic paint to add accents to look like icing.

Tiered tray with painted Dollar Tree houses to look like gingerbread houses.
After – Dollar Tree Gingerbread Houses Makeover

Closeup of two of three Dollar Tree miniature plastic houses painted to look like gingerbread houses.
Closeup – Dollar Tree Gingerbread House Makeover

6. Wine Cork Christmas Tree

Grab some 16-gauge copper wire, small bells, a hot glue gun, needle nose, wire cutting pliers, and a few wine corks to make a stunning tree for your Holiday Tiered Tray.

First, you’ll need to hot glue your corks together into a tree shape. Then, string bells onto the copper wire and begin wrapping it around the tree. I recommend not cutting the wire from the roll until you’re finished wrapping it around so you don’t cut it too short. Once you are done wrapping the wire around your tree, cut the ends with wire-cutting pliers and curl with needle nose pliers to finish.

Miniature Christmas tree made out of 17 wine corks decorated with a string of red and green bells on copper wire.
Wine Cork Christmas Tree

++++++++

Related Post

Amazing upcycled Christmas decor ideas to transform ordinary items into beautiful one-of-a-kind handmade pieces!

++++++++

7. Metallic-Painted Reindeer

I found plastic reindeer in the Target Dollar Spot and bought two for my tiered tray.

Paint used to make metallic reindeer for a holiday tiered tray.
Before

With a coat of spray paint primer and a couple of coats of metallic bronze paint spray, they’ve been transformed into sophisticated, high-end decor pieces!

After – Metallic-Painted Reindeer

8. Hot Cocoa Mini Pillow

Make a cute mini pillow using scrap fabric for your holiday-tiered tray! If you have a cutting machine, you can make this cute pillow in just a few minutes. To get the art for this pillow and three other designs, visit the full tutorial here –> Farmhouse Mini Pillows for Your Tiered Tray – Free SVG Stencils

Closeup photo of a finished mini pillow with the words 'Hot Cocoa' and a cup of cocoa with marshmallows on top.
Hot Cocoa Mini Pillow

++++++++

Related Post

Learn how to make beautiful farmhouse signs from 2 x 4's!

++++++++

9. Snow Globes

Pick up a few clear plastic mini bowls and a 5-inch clear plastic ornament ball from Dollar Tree to make mini snow globes! These small snow globes are adorable and they’re the perfect size to display on a holiday-tiered tray. Get all the details on this easy project and more snow globe ideas in my post –> DIY Holiday Snow Globes.

Finished mini snow globes made with wood slices, mini plastic bowls and clear plastic bulb ornaments shown. Two shown, one with a snowman and faux snow and the other filled with mini bottle trees and faux snow.

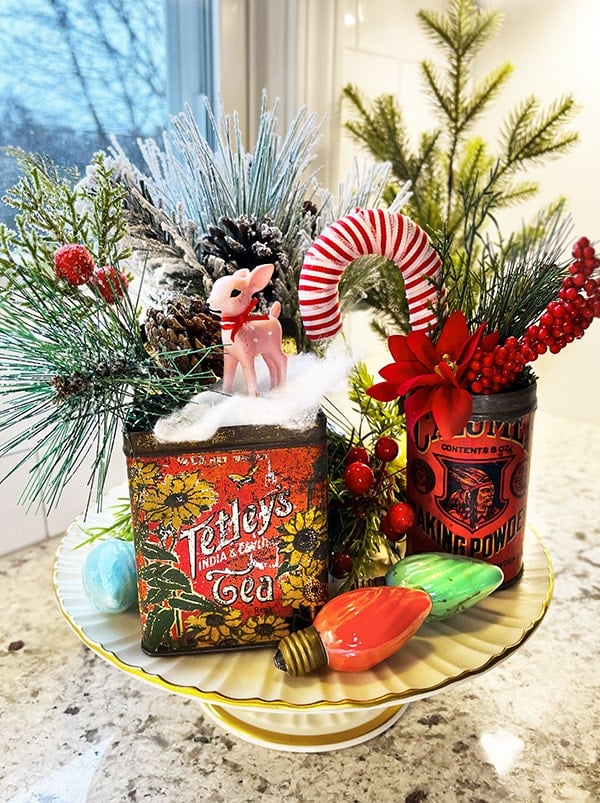
10. Nostalgic and Thrifted Items

This idea is for my vintage-loving friends. If you have an antique store in your area or shop on Etsy, you can find all sorts of beautiful containers and vintage Christmas items to display on your holiday-tiered tray.

Tray filled with greenery, vintage colorful Christmas light bulbs, a Rumford Baking Soda can with greenery in it and a rectangular vintage Tetley's Tea container with greenery, faux snow and a small pink vintage looking reindeer in it.
Nostalgic Christmas Tray

items to Keep an Eye out for:

  • colorful glassware
  • holiday teacups and saucers
  • vintage ornaments
  • tins and small containers
  • holiday figurines
  • cookie cutters
  • salt shakers
  • linens

Here I used vintage tins that I picked up for a few dollars at my local antique store. These tins range from about $3 to $12 depending on condition and age. The little pink deer is not vintage (it’s from Target) but it has that nostalgic look so I added it in. Mix and match items and colors to create your own nostalgic scene using thrifted and vintage finds!

++++++++

I hope you enjoy these Christmas Tiered Tray Ideas! Leave a comment below and let me know which DIY you liked the most.

Vertical image to pin to Pinterest boards to come back to later.

++++++++

MORE HOLIDAY CRAFTS TO TRY:

++++++++

Watch A Video

Link to the full tutorial here –> Wood Snowflake Decoration Made From Wood Shims

++++++++

Leave a Reply